-de8bd8f33c3e44a59907dafe1884f228.png)


准备
环境
- IDE:Idea
- SpringBoot版本:1.5.19
- UI:BootStrap 4
- 模板引擎:thymeleaf 3
- 效果:Restful 风格 CRUD 功能的 Demo
依赖
<!-- pom.xml -->
<?xml version="1.0" encoding="UTF-8"?>
<project xmlns="http://maven.apache.org/POM/4.0.0" xmlns:xsi="http://www.w3.org/2001/XMLSchema-instance"
         xsi:schemaLocation="http://maven.apache.org/POM/4.0.0 http://maven.apache.org/xsd/maven-4.0.0.xsd">
    <modelVersion>4.0.0</modelVersion>
    <parent>
        <groupId>org.springframework.boot</groupId>
        <artifactId>spring-boot-starter-parent</artifactId>
        <version>1.5.19.RELEASE</version>
        <relativePath/> <!-- lookup parent from repository -->
    </parent>
    <groupId>com.springboot</groupId>
    <artifactId>webdev2</artifactId>
    <version>0.0.1-SNAPSHOT</version>
    <name>webdev2</name>
    <description>Demo project for Spring Boot</description>

    <properties>
        <java.version>1.8</java.version>
        <thymeleaf.version>3.0.2.RELEASE</thymeleaf.version>
        <!--布局功能支持程序,thymeleaf 使用 3.0 版本以上时支持程序要使用 2.0 以上-->
        <thymeleaf-layout-dialect.version>2.1.1</thymeleaf-layout-dialect.version>
    </properties>

    <dependencies>
        <dependency>
            <groupId>org.springframework.boot</groupId>
            <artifactId>spring-boot-starter-web</artifactId>
        </dependency>

        <dependency>
            <groupId>org.springframework.boot</groupId>
            <artifactId>spring-boot-starter-test</artifactId>
            <scope>test</scope>
        </dependency>

        <dependency>
            <groupId>org.springframework.boot</groupId>
            <artifactId>spring-boot-starter-thymeleaf</artifactId>
        </dependency>

        <dependency>
            <groupId>org.webjars</groupId>
            <artifactId>bootstrap</artifactId>
            <version>4.3.1</version>
        </dependency>
        <dependency>
            <groupId>org.springframework.boot</groupId>
            <artifactId>spring-boot-devtools</artifactId>
        </dependency>
    </dependencies>

    <build>
        <plugins>
            <plugin>
                <groupId>org.springframework.boot</groupId>
                <artifactId>spring-boot-maven-plugin</artifactId>
            </plugin>
        </plugins>
    </build>

</project>
CSS样式
/* static/css/signin.css */
html,body {
  height: 100%;
}

body {
  display: -ms-flexbox;
  display: -webkit-box;
  display: flex;
  -ms-flex-align: center;
  -ms-flex-pack: center;
  -webkit-box-align: center;
  align-items: center;
  -webkit-box-pack: center;
  justify-content: center;
  padding-top: 40px;
  padding-bottom: 40px;
  background-color: #f5f5f5;
}

.form-signin {
  width: 100%;
  max-width: 330px;
  padding: 15px;
  margin: 0 auto;
}
.form-signin .checkbox {
  font-weight: 400;
}
.form-signin .form-control {
  position: relative;
  box-sizing: border-box;
  height: auto;
  padding: 10px;
  font-size: 16px;
}
.form-signin .form-control:focus {
  z-index: 2;
}
.form-signin input[type="email"] {
  margin-bottom: -1px;
  border-bottom-right-radius: 0;
  border-bottom-left-radius: 0;
}
.form-signin input[type="password"] {
  margin-bottom: 10px;
  border-top-left-radius: 0;
  border-top-right-radius: 0;
}
POJO
// com.springboot.webdev2.bean.User
import java.util.Date;

public class User {
    public User() {
    }

    public User(Integer id,String name, String email, Integer gender, Date birthday) {
        this.id = id;
        this.name = name;
        this.email = email;
        this.gender = gender;
        this.birthday = birthday;
    }

    private  Integer id;
    private  String name;
    private  String email;
    private Integer gender;
    private Date birthday;

    public Integer getId() {
        return id;
    }

    public void setId(Integer id) {
        this.id = id;
    }

    public String getName() {
        return name;
    }

    public void setName(String name) {
        this.name = name;
    }

    public String getEmail() {
        return email;
    }

    public void setEmail(String email) {
        this.email = email;
    }

    public Integer getGender() {
        return gender;
    }

    public void setGender(Integer gender) {
        this.gender = gender;
    }

    public Date getBirthday() {
        return birthday;
    }

    public void setBirthday(Date birthday) {
        this.birthday = birthday;
    }
}
模拟数据层
// com.springboot.webdev2.dao.UserDao
import com.springboot.webdev2.bean.User;
import org.springframework.stereotype.Repository;

import java.text.ParseException;
import java.text.SimpleDateFormat;
import java.util.ArrayList;
import java.util.List;

@Repository
public class UserDao {
    private static List<User> userList;
    private static int id = 3;
    static {
        /**
         * 模拟 db 数据
         */
        userList = new ArrayList<>();
        SimpleDateFormat simpleDateFormat = new SimpleDateFormat("yyyy-MM-dd");
        try {
            userList.add(new User(1,"张三", "asda@qq.com", 1, simpleDateFormat.parse("2019-1-1")));
            userList.add(new User(2,"李四", "32432@qq.com", 0, simpleDateFormat.parse("2014-3-11")));
            userList.add(new User(3,"王五", "dae@qq.com", 1, simpleDateFormat.parse("2012-1-1")));
        } catch (ParseException e) {
            e.printStackTrace();
        }
    }

    public List<User> listAll(){
        return userList;
    }

    public void save(User user){
        user.setId(++id);
        userList.add(user);
    }

    public void delete(Integer id){
        userList.removeIf(p -> p.getId() == id);
    }

    public User getById(Integer id){
        for (User user : userList) {
            if (user.getId() == id) {
                return user;
            }
        }
        return null;
    }

    public void update(User user){
        User dbUser = getById(user.getId());
        dbUser.setName(user.getName());
        dbUser.setBirthday(user.getBirthday());
        dbUser.setEmail(user.getEmail());
        dbUser.setGender(user.getGender());
    }

}
编码
WebJars 使用-引入 BootStrap
之前我们通过 Maven 引入的依赖 jar 中大多都是类文件,其实通过 Maven 还可以引入静态文件,比如我们下面要用的 BootStrap,我们只需要添加如下依赖:
<dependency>
    <groupId>org.webjars</groupId>
    <artifactId>bootstrap</artifactId>
    <version>4.3.1</version>
</dependency>
如果要引入其它静态资源依赖可参考 webjars.org。
原理:通过之前的学习我们已经了解了静态资源映射,只要将静态资源放在
classpath:/META-INF/resources/webjars/下,我们就可以通过/webjars/**请求访问到对应静态资源。
国际化-登录页
1、首先要创建国际化使用的资源文件:
# login.properties
login.password=密码
login.please=请登录
login.rememberMe=记住我
login.signin=登录
login.username=用户名
# login_en_US.properties
login.password=password
login.please=please login
login.rememberMe=Remember Me
login.signin=Sing In
login.username=UserName
2、配置国际化资源目录:
# application.properties
# 如果有多个目录可以 , 分隔,起始目录为 classpath
spring.messages.basename=i18n.login
3、编写登录模板页面,引用 BootStrap,使用 #{属性名} 引入国际化资源属性:
<!-- templates/login.html -->
<!doctype html>
<html xmlns:th="http://www.thymeleaf.org">
<head>
<meta charset="utf-8">
<meta name="viewport" content="width=device-width, initial-scale=1, shrink-to-fit=no">
<meta name="description" content="">
<meta name="author" content="">
<title>[[#{login.please}]]</title>
<link th:href="@{/webjars/bootstrap/4.3.1/css/bootstrap.css}" rel="stylesheet">
<link th:href="@{/css/signin.css}" rel="stylesheet">
</head>
<body>
<form th:action="@{/login}" method="post">
<h1 class="h3 mb-3 font-weight-normal">[[#{login.please}]]</h1>
<label for="inputEmail" th:text="#{login.username}"></label>
<input type="text" id="inputEmail" th:name="username" th:placeholder="#{login.username}" required autofocus>
<label for="inputPassword" th:text="#{login.password}"></label>
<input type="password" id="inputPassword" th:name="password" th:placeholder="#{login.password}" required>
<div class="checkbox mb-3">
<label>
<input type="checkbox" value="remember-me">[[#{login.rememberMe}]]
</label>
</div>
<button class="btn btn-lg btn-primary btn-block" th:text="#{login.signin}" type="submit"></button>
<span th:if="${msg!=null}" style="color:red;">[[${msg}]]</span>
<p class="mt-5 mb-3 text-muted">© 2019-2020</p>
</form>
</body>
</html>
4、做完上述步骤其实已经完成了登录页面国际化,但 SpringBoot 默认配置的国际化解析器是根据客户端请求头来返回对应语言资源的。如果我们想要定制自己的国际化规则,可以自定义国际化解析器如下:
// com.springboot.webdev2.component.MyLocaleResolver
import org.springframework.util.StringUtils;
import org.springframework.web.servlet.LocaleResolver;

import javax.servlet.http.HttpServletRequest;
import javax.servlet.http.HttpServletResponse;
import java.util.Locale;

/**
 * 自定义国际化解析器
 *      作用:
 *          如果客户端请求携带了语言参数,则根据语言参数返回相应资源
 *          如果客户端未携带语言参数,则根据语言请求头返回相应资源
 */
public class MyLocaleResolver implements LocaleResolver {
    @Override
    public Locale resolveLocale(HttpServletRequest httpServletRequest) {
        // 获取请求语言参数
        String langCode = httpServletRequest.getParameter("langCode");
        Locale locale = Locale.getDefault();
        // 如果没有传递请求参数
        if (StringUtils.isEmpty(langCode)) {
            // 获取语言请求头
            String languageHeader = httpServletRequest.getHeader("Accept-Language");
            String[] langInfo = languageHeader.split(";");
            if (langInfo != null && langInfo.length != 0) {
                String langsStr = langInfo[0];
                String[] langArr = langsStr.split(",");
                langCode = langArr[0];
            }
        }
        String[] strs = langCode.split("-");
        locale = new Locale(strs[0], strs[1]);
        return locale;
    }

    @Override
    public void setLocale(HttpServletRequest httpServletRequest, HttpServletResponse httpServletResponse, Locale locale) {

    }
}
5、接下来我们就可以配置页面映射,还需要注意的是,编写完国际化解析器后还需要将其注册到容器中才会生效:
// com.springboot.webdev2.config.MyMvcConfig
import com.springboot.webdev2.component.MyLocaleResolver;
import org.springframework.context.annotation.Bean;
import org.springframework.context.annotation.Configuration;
import org.springframework.web.servlet.LocaleResolver;
import org.springframework.web.servlet.config.annotation.ViewControllerRegistry;
import org.springframework.web.servlet.config.annotation.WebMvcConfigurerAdapter;

/**
 * SpringMVC 扩展配置类
 */
@Configuration
public class MyMvcConfig extends WebMvcConfigurerAdapter {

    @Bean
    public WebMvcConfigurerAdapter webMvcConfigurerAdapter(){
        WebMvcConfigurerAdapter webMvcConfigurerAdapter = new WebMvcConfigurerAdapter(){
            @Override
            public void addViewControllers(ViewControllerRegistry registry) {
                // 配置首页映射为登录页
                registry.addViewController("/").setViewName("login");
                registry.addViewController("/index.html").setViewName("login");
            }
        };
        return webMvcConfigurerAdapter;
    }

    /**
     * 注册国际化解析器到容器
     */
    @Bean
    public LocaleResolver localeResolver(){
        return new MyLocaleResolver();
    }
}
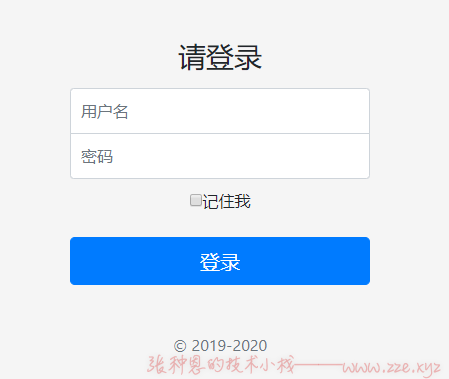
6、测试不指定语言参数,请求 localhost:8080:
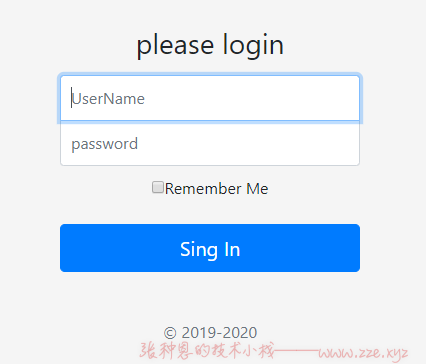
7、测试指定语言参数,请求 localhost:8080?langCode=en-US:
源码分析
Spring Boot 自动配置好了国际化资源文件的组件,对应类为:
// org.springframework.boot.autoconfigure.context.MessageSourceAutoConfiguration
@Configuration
@ConditionalOnMissingBean(value = MessageSource.class, search = SearchStrategy.CURRENT)
@AutoConfigureOrder(Ordered.HIGHEST_PRECEDENCE)
@Conditional(ResourceBundleCondition.class)
@EnableConfigurationProperties
// 与 spring.messages 下属性绑定
@ConfigurationProperties(prefix = " spring.messages")
public class MessageSourceAutoConfiguration {

    private static final Resource[] NO_RESOURCES = {};

    /*
    国际化资源文件的默认基础名为 messages
    所以我们国际化属性可以直接定义在 classpath 下 messages.properties 文件中
    */
    private String basename = "messages";

    private Charset encoding = Charset.forName("UTF-8");

    private int cacheSeconds = -1;

    private boolean fallbackToSystemLocale = true;

    private boolean alwaysUseMessageFormat = false;

    @Bean
    public MessageSource messageSource() {
        ResourceBundleMessageSource messageSource = new ResourceBundleMessageSource();
        if (StringUtils.hasText(this.basename)) {
            // 设置国际化资源文件的基础名(如:login_zh_CN、login_en_US 的基础名就为 login)
            messageSource.setBasenames(StringUtils.commaDelimitedListToStringArray(
                    StringUtils.trimAllWhitespace(this.basename)));
        }
        if (this.encoding != null) {
            messageSource.setDefaultEncoding(this.encoding.name());
        }
        messageSource.setFallbackToSystemLocale(this.fallbackToSystemLocale);
        messageSource.setCacheSeconds(this.cacheSeconds);
        messageSource.setAlwaysUseMessageFormat(this.alwaysUseMessageFormat);
        return messageSource;
    }

    public String getBasename() {
        return this.basename;
    }

    public void setBasename(String basename) {
        this.basename = basename;
    }

    public Charset getEncoding() {
        return this.encoding;
    }

    public void setEncoding(Charset encoding) {
        this.encoding = encoding;
    }

    public int getCacheSeconds() {
        return this.cacheSeconds;
    }

    public void setCacheSeconds(int cacheSeconds) {
        this.cacheSeconds = cacheSeconds;
    }

    public boolean isFallbackToSystemLocale() {
        return this.fallbackToSystemLocale;
    }

    public void setFallbackToSystemLocale(boolean fallbackToSystemLocale) {
        this.fallbackToSystemLocale = fallbackToSystemLocale;
    }

    public boolean isAlwaysUseMessageFormat() {
        return this.alwaysUseMessageFormat;
    }

    public void setAlwaysUseMessageFormat(boolean alwaysUseMessageFormat) {
        this.alwaysUseMessageFormat = alwaysUseMessageFormat;
    }

}
而在 SpringMVC 的自动配置类中配置了默认的国际化解析器:
// org.springframework.boot.autoconfigure.web.WebMvcAutoConfiguration.WebMvcAutoConfigurationAdapter#localeResolver
@Bean
@ConditionalOnMissingBean  // 当容器中没有国际化解析器时才使用注册如下解析器,即如果我们自己在容器中注册了国际化解析器 SpringMVC 就会使用我们自己的国际化解析器
@ConditionalOnProperty(prefix = "spring.mvc", name = "locale")
public LocaleResolver localeResolver() {
    if (this.mvcProperties
            .getLocaleResolver() == WebMvcProperties.LocaleResolver.FIXED) {
        return new FixedLocaleResolver(this.mvcProperties.getLocale());
    }
    AcceptHeaderLocaleResolver localeResolver = new AcceptHeaderLocaleResolver();
    localeResolver.setDefaultLocale(this.mvcProperties.getLocale());
    return localeResolver;
}
Thymeleaf 布局-抽取公共页
1、顶部栏:
<!-- templates/fragment/topbar.html -->
<nav class="navbar navbar-dark sticky-top bg-dark flex-md-nowrap p-0">
    <a class="navbar-brand col-sm-3 col-md-2 mr-0" href="#">[[${#session.getAttribute('loginUser')}]]</a>
    <input class="form-control form-control-dark w-100" type="text" placeholder="Search" aria-label="Search">
    <ul class="navbar-nav px-3">
        <li class="nav-item text-nowrap">
            <a class="nav-link" href="#">Sign out</a>
        </li>
    </ul>
</nav>
2、抽取左边菜单栏,动态高亮:
<!-- templates/fragment/leftmenu.html -->
<nav class="col-md-2 d-none d-md-block bg-light sidebar" xmlns:th="http://www.thymeleaf.org">
    <div class="sidebar-sticky">
        <ul class="nav flex-column" th:with="activeURI=${#request.getRequestURI()}">
            <li class="nav-item">
                <a th:class="${activeURI}==@{/} or ${acitveURI}==@{/index.html} ?'nav-link active':'nav-link'"
                   th:href="@{/}">
                    <span data-feather="home"></span>
                    首页
                </a>
            </li>
            <li class="nav-item">
                <a th:class="${activeURI}==@{/users}?'nav-link active':'nav-link'" th:href="@{/users}">
                    <span data-feather="file"></span>
                    用户列表
                </a>
            </li>
        </ul>
    </div>
</nav>
<!-- Bootstrap core JavaScript
================================================== -->
<!-- Placed at the end of the document so the pages load faster -->
<script src="https://code.jquery.com/jquery-3.2.1.slim.min.js" integrity="sha384-KJ3o2DKtIkvYIK3UENzmM7KCkRr/rE9/Qpg6aAZGJwFDMVNA/GpGFF93hXpG5KkN" crossorigin="anonymous"></script>
<script>window.jQuery || document.write('<script src="../../../../assets/js/vendor/jquery-slim.min.js"><\/script>')</script>

<!-- Icons -->
<script src="https://unpkg.com/feather-icons/dist/feather.min.js"></script>
<script>
    feather.replace()
</script>
3、首页引用公共页:
<!-- templates/index.html -->
<!doctype html>
<html xmlns:th="http://www.thymeleaf.org">
<head>
    <meta charset="utf-8">
    <meta name="viewport" content="width=device-width, initial-scale=1, shrink-to-fit=no">
    <meta name="description" content="">
    <meta name="author" content="">

    <title>首页</title>

    <link th:href="@{/webjars/bootstrap/4.3.1/css/bootstrap.css}" rel="stylesheet">
    <link th:href="@{/css/index.css}" rel="stylesheet">
</head>

<body>
<nav th:replace="fragment/topbar :: nav"/>
<div>
    <div>
        <nav th:replace="fragment/leftmenu"/>

        <main role="main" class="col-md-9 ml-sm-auto col-lg-10 pt-3 px-4">

            <h2>首页</h2>
        </main>
    </div>
</div>
</body>
</html>
拦截器-登录校验
1、编写登录控制器:
// com.springboot.webdev2.controller.LoginController
import org.springframework.stereotype.Controller;
import org.springframework.ui.Model;
import org.springframework.util.StringUtils;
import org.springframework.web.bind.annotation.GetMapping;
import org.springframework.web.bind.annotation.PostMapping;

import javax.servlet.http.HttpSession;

@Controller
public class LoginController {

    @GetMapping("/login")
    public String loginView(){
        return "login";
    }

    @PostMapping("/login")
    public String login(String username, String password, HttpSession session, Model model){
        if(!StringUtils.isEmpty(username)&&"123456".equals(password)){
            session.setAttribute("loginUser",username);
            return "redirect:/index.html";
        }
        model.addAttribute("msg", "用户名或密码错误");
        return "/login";
    }
}
2、编写登录拦截器:
// com.springboot.webdev2.component.LoginInterceptor
import org.springframework.web.servlet.HandlerInterceptor;
import org.springframework.web.servlet.ModelAndView;

import javax.servlet.http.HttpServletRequest;
import javax.servlet.http.HttpServletResponse;

public class LoginInterceptor implements HandlerInterceptor {
    @Override
    public boolean preHandle(HttpServletRequest httpServletRequest, HttpServletResponse httpServletResponse, Object o) throws Exception {
        Object loginUser = httpServletRequest.getSession().getAttribute("loginUser");
        if (loginUser==null){
            httpServletResponse.sendRedirect("/login");
            return false;
        }
        return true;
    }

    @Override
    public void postHandle(HttpServletRequest httpServletRequest, HttpServletResponse httpServletResponse, Object o, ModelAndView modelAndView) throws Exception {

    }

    @Override
    public void afterCompletion(HttpServletRequest httpServletRequest, HttpServletResponse httpServletResponse, Object o, Exception e) throws Exception {

    }
}
3、注册拦截器:
// com.springboot.webdev2.config.MyMvcConfig
import com.springboot.webdev2.component.LoginInterceptor;
import com.springboot.webdev2.component.MyLocaleResolver;
import org.springframework.context.annotation.Bean;
import org.springframework.context.annotation.Configuration;
import org.springframework.web.servlet.LocaleResolver;
import org.springframework.web.servlet.config.annotation.InterceptorRegistry;
import org.springframework.web.servlet.config.annotation.ViewControllerRegistry;
import org.springframework.web.servlet.config.annotation.WebMvcConfigurerAdapter;

/**
 * SpringMVC 扩展配置类
 */
@Configuration
public class MyMvcConfig extends WebMvcConfigurerAdapter {

    @Bean
    public WebMvcConfigurerAdapter webMvcConfigurerAdapter(){
        WebMvcConfigurerAdapter webMvcConfigurerAdapter = new WebMvcConfigurerAdapter(){
            @Override
            public void addInterceptors(InterceptorRegistry registry) {
                // 注册拦截器,不拦截 /login 请求
                registry.addInterceptor(new LoginInterceptor()).excludePathPatterns("/login");
            }

            @Override
            public void addViewControllers(ViewControllerRegistry registry) {
                registry.addViewController("/").setViewName("index");
                registry.addViewController("/index.html").setViewName("index");
            }
        };


        return webMvcConfigurerAdapter;
    }

    /**
     * 注册国际化解析器到容器
     */
    @Bean
    public LocaleResolver localeResolver(){
        return new MyLocaleResolver();
    }
}
CRUD 功能实现
1、编写 User 控制器:
// com.springboot.webdev2.controller.UserController
import com.springboot.webdev2.bean.User;
import com.springboot.webdev2.dao.UserDao;
import org.springframework.beans.factory.annotation.Autowired;
import org.springframework.stereotype.Controller;
import org.springframework.ui.Model;
import org.springframework.web.bind.annotation.*;

import java.util.List;

@Controller
public class UserController {

    @Autowired
    private UserDao userDao;

    @GetMapping("/users")
    public String listAll(Model model) {
        List<User> users = userDao.listAll();
        model.addAttribute("userList", users);
        return "users";
    }

    @GetMapping("/user/{id}")
    public String updateView(@PathVariable Integer id, Model model) {
        User user = userDao.getById(id);
        model.addAttribute("user", user);
        return "user";
    }

    @GetMapping("/user")
    public String addView(Model model) {
        // 因为页面使用了 th:object ,如果 user 为 null 会异常
        model.addAttribute("user", new User());
        return "user";
    }

    @PostMapping("/user")
    public String save(User user) {
        userDao.save(user);
        return "redirect:/users";
    }

    @PutMapping("/user")
    public String update(User user) {
        userDao.update(user);
        return "redirect:/users";
    }

    @DeleteMapping("/user/{id}")
    public String delete(@PathVariable Integer id) {
        userDao.delete(id);
        return "redirect:/users";
    }
}
2、编写列表页:
<!-- templates/users.html -->
<!doctype html>
<html xmlns:th="http://www.thymeleaf.org">
  <head>
    <meta charset="utf-8">
    <meta name="viewport" content="width=device-width, initial-scale=1, shrink-to-fit=no">
    <meta name="description" content="">
    <meta name="author" content="">

    <title>用户列表</title>

    <link th:href="@{/webjars/bootstrap/4.3.1/css/bootstrap.css}" rel="stylesheet">
    <link th:href="@{/css/index.css}" rel="stylesheet">
  </head>

  <body>
  <nav th:replace="fragment/topbar :: nav"/>
  <div>
    <div>
      <nav th:replace="fragment/leftmenu"/>

      <main role="main" class="col-md-9 ml-sm-auto col-lg-10 pt-3 px-4">

        <h2>用户列表</h2>
        <button th:onclick="|window.location.href='@{/user}'|" class="btn btn-sm btn-success">添加</button>
        <div>
          <table class="table table-striped table-sm">
            <thead>
            <tr>
              <th>编号</th>
              <th>姓名</th>
              <th>邮箱</th>
              <th>性别</th>
              <th>生日</th>
              <th>操作</th>
            </tr>
            </thead>
            <tbody>
            <tr th:each="user : ${userList}">
              <td th:text="${user.id}"/>
              <td th:text="${user.name}"/>
              <td th:text="${user.email}"/>
              <td th:text="${user.gender}==0?'女':'男'"/>
              <td th:text="${#dates.format(user.birthday,'yyyy-MM-dd')}"/>
              <td>
                <form th:action="@{/user/}+${user.id}" method="post">
                  <input type="button" th:onclick="|window.location.href='@{/}user/${user.id}'|" class="btn btn-sm btn-info" value="编辑"/>
                  <input type="hidden" name="_method" value="delete">
                  <input type="submit" value="删除" class="btn btn-sm btn-danger"/>
                </form>
              </td>
            </tr>
            </tbody>
          </table>
        </div>
      </main>
    </div>
  </div>
  </body>
</html>
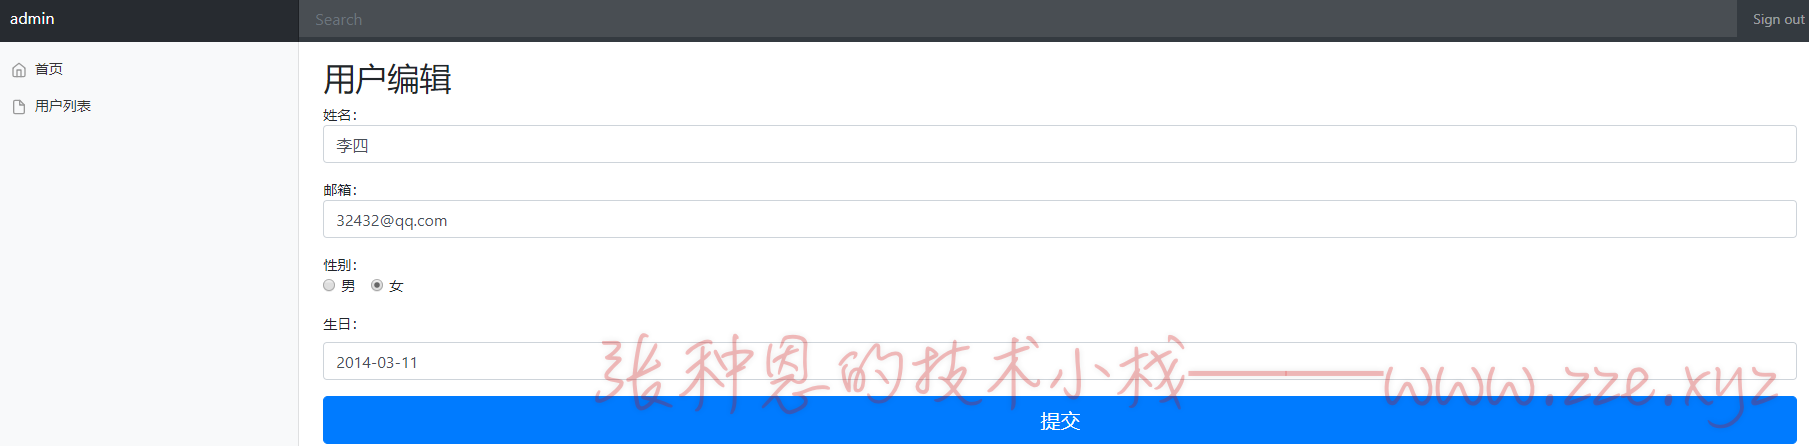
3、编写编辑页:
<!-- templates/user.html -->
<!doctype html>
<html xmlns:th="http://www.thymeleaf.org">
<head>
<meta charset="utf-8">
<meta name="viewport" content="width=device-width, initial-scale=1, shrink-to-fit=no">
<meta name="description" content="">
<meta name="author" content="">
<title>[[${user.id==null?'添加':'编辑'}]]</title>
<link th:href="@{/webjars/bootstrap/4.3.1/css/bootstrap.css}" rel="stylesheet">
<link th:href="@{/css/index.css}" rel="stylesheet">
</head>
<body>
<nav th:replace="fragment/topbar :: nav"/>
<div>
<div>
<nav th:replace="fragment/leftmenu"/>
<main role="main" class="col-md-9 ml-sm-auto col-lg-10 pt-3 px-4">
<h2>用户[[${user.id==null?'添加':'编辑'}]]</h2>
<form th:action="@{/user}" method="post" th:object="${user}">
<input type="hidden" name="id" th:value="*{id}">
<input type="hidden" name="_method" value="put" th:unless="${user.id==null}">
<div>
<lable>姓名:</lable>
<input type="text" name="name" th:value="*{name}" placeholder="姓名"/>
</div>
<div>
<lable>邮箱:</lable>
<input type="email" name="email" th:value="*{email}" placeholder="邮箱"/>
</div>
<div>
<lable>性别:</lable>
<br>
<div class="form-check form-check-inline">
<input type="radio" th:checked="*{gender}==1" name="gender" value="1"/>
<label>男</label>
</div>
<div class="form-check form-check-inline">
<input type="radio" th:checked="*{gender}==0" name="gender" value="0"/>
<label>女</label>
</div>
</div>
<div>
<label>生日:</label>
<input type="text" name="birthday" th:value="*{#dates.format(birthday,'yyyy-MM-dd')}" placeholder="生日"/>
</div>
<button class="btn btn-lg btn-primary btn-block" th:text="提交" type="submit"></button>
<span th:if="${msg!=null}" style="color:red;">[[${msg}]]</span>
<p class="mt-5 mb-3 text-muted">© 2019-2020</p>
</form>
</main>
</div>
</div>
</body>
</html>
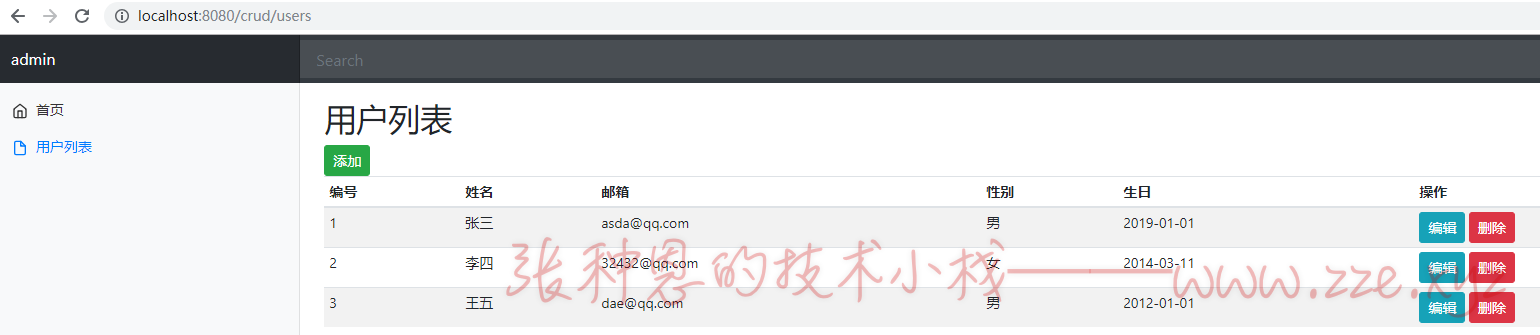
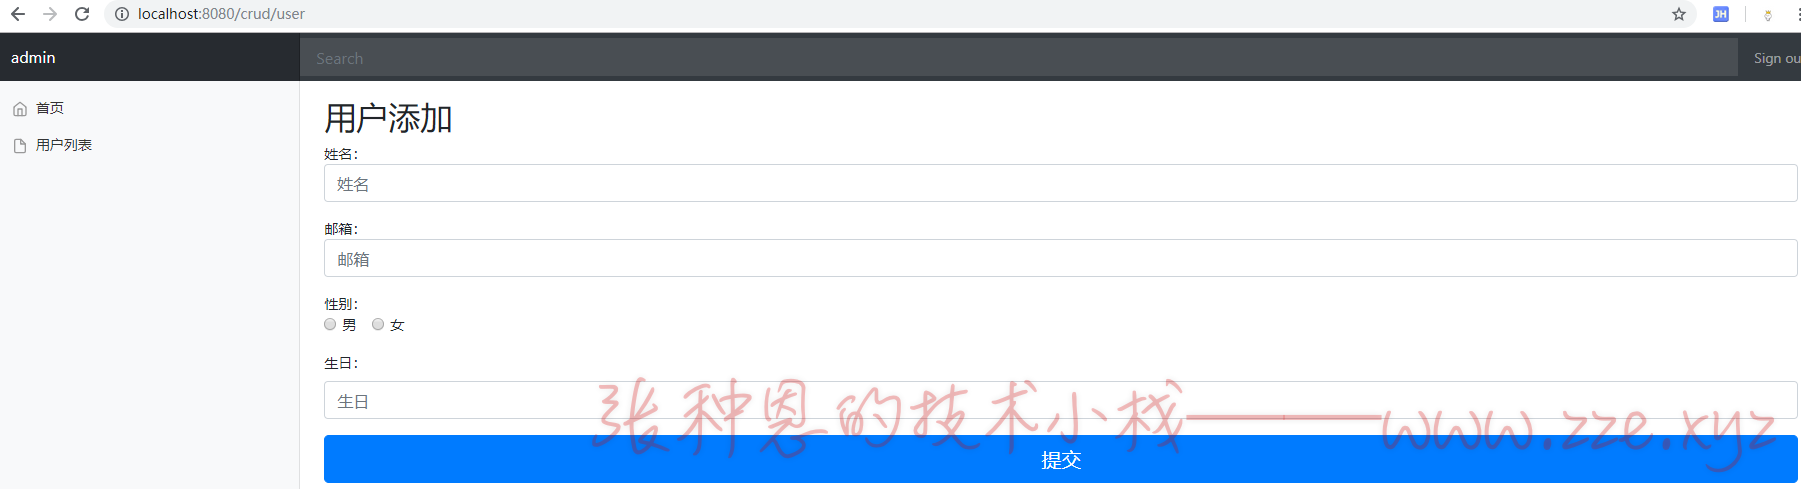
4、效果如下:
注意点
在添加和修改时有提交日期类型数据,需要在配置文件中配置日期格式化规则 spring.mvc.date-format=yyyy-MM-dd。
修改和删除操作提交时我们需要使用特殊请求( PUT 和 DELETE ),但表单本身又是不支持特殊请求的,SpringMVC 本身是给我们提供了一个 HTTP 方法过滤器(HiddenHttpMethodFilter),该过滤器的作用就是让 SpringMVC 将我们的普通请求当做特殊请求来处理,并且 SpringBoot 已经帮我们配置好了这个过滤器。
使用该功能我们需要做一些额外的操作告知 SpringMVC 我们的请求是复杂请求:
- 表单的请求方法必须为 POST;
- 我们需要在表单中提供一个隐藏域,且该隐藏域
name需指定为"_method"(可修改配置),value 则为我们要使用的请求方式;
// org.springframework.boot.autoconfigure.web.WebMvcAutoConfiguration#hiddenHttpMethodFilter : SpringBoot 自动配置的 HTTP 方法过滤器
@Bean
@ConditionalOnMissingBean(HiddenHttpMethodFilter.class)
public OrderedHiddenHttpMethodFilter hiddenHttpMethodFilter() {
  return new OrderedHiddenHttpMethodFilter();
}
评论区